


Valheim may tell nothing to you and you're right, why should it sound familiar when it got in the 1° position of Steam popular games in less than 2 weeks...
Sarcasm aside, one of the greatest features of the game is that it allows you to create your own private server and that's why you're here. Let's just jump into it.
Setup
For our server, I'm using a $5 VPS (CX21) on Hetzner. You can get one too with a free credit of $20, if you want.
We're gonna use the beautiful CLI LinuxGSM to quickly set up our server, so let's just follow their instructions.
Install needed dependencies running with root privileges the command
sudo dpkg --add-architecture i386; sudo apt update; sudo apt install curl wget file tar bzip2 gzip unzip bsdmainutils python util-linux ca-certificates binutils bc jq tmux netcat lib32gcc1 lib32stdc++6 steamcmd.Create a new user for our game server:
adduser vhserverLog in as the created user with
su - vhserverDownload the game manager CLI tool:
wget -O linuxgsm.sh https://linuxgsm.sh && chmod +x linuxgsm.sh && bash linuxgsm.sh vhserverInstall the game server following the on-screen instructions:
./vhserver install
If you get an error about
Error processing libc6:i386 and libtinfo5:i386just runsudo apt-get install --reinstall libc6-i386into your terminal.
So far so good. Now let's jump to server settings.
Settings (name, password and more)
We may want to change some settings about our server, like choosing a password or renaming it. This is simpler than it sounds like.
Every setting file can be found inside our /home/vhserver/lgsm/config-lgsm/vhserver folder. In our case, we want to change the password and the server name.
Let's edit the file vhserver.cfg by running nano ~/lgsm/config-lgsm/vhserver/vhserver.cfg and just paste the following content inside it:
servername="Our beautiful server"
# Minimum password length is 5.
serverpassword="mypassword"
That's it. Simple, right? There are a lot of settings you can customize; if you're curious about them, just give a shot to the _default.cfg file: cat ~/lgsm/config-lgsm/vhserver/_default.cfg.
You will see you can change the port, the number of backups kept in the disk and, of course, the world-saving files.
Run the server
To start your server just hit ./vhserver start from your home directory (/home/vhserver) and that's it!
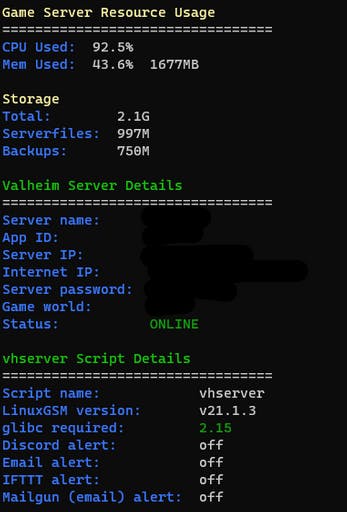
You can see all the details about your game server by running ./vhserver details: you'll get useful information such as available resources (CPU, Memory), a recap of server configurations and many other things.
Connect to the server
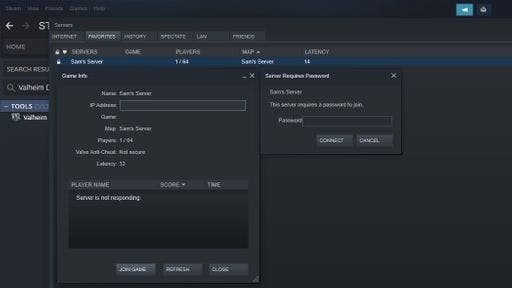
To connect directly to your server go to Steam -> View -> Servers -> Favorites -> Add server and type your IP:PORT, for example 1.2.3.4:2456. If Steam says that the "Server is not responding" try to put the next port, for example 2457.
Now just click on "Connect", go to your Valheim game window and select your character.
Keep alive, Backups and Updates
Following again the LinuxGSM Valheim guide we can set up several cronjobs to keep our server up-to-date and, most importantly, to keep it alive and to back up it, you know, just to be safe.
To setup them up, run crontab -e from your terminal and past our commands:
*/5 * * * * /home/vhserver/vhserver monitor > /dev/null 2>&1
*/30 * * * * /home/vhserver/vhserver update > /dev/null 2>&1
0 0 * * 0 /home/vhserver/vhserver update-lgsm > /dev/null 2>&1
30 1 * * * /home/vhserver/vhserver backup > /dev/null 2>&1
With the given commands, it will:
Check every 5 minutes if the server is still alive and, if it is not, it will be restarted;
Check every 30 minutes if there are updates for our game server;
Check every Sunday at 1am if there are updates for LinuxGSM CLI;
Do a backup every day at 1:30am.
By default 4 backups will be kept in our disk: if another one is gonna be created, the oldest will be deleted to keep the number always at 4. You can customize this behavior by editing the backup settings in your vhserver.cfg file like we did before to change our game name and password.
Bonus 1: change server port
If you would like to change the game server port, edit the config file with nano ~/lgsm/config-lgsm/vhserver/vhserver.cfg and add a port settings with your desired value.
port="1337"
Of course remember to change your server on Steam favorite's too, for example 1.2.3.4:1337. If Steam says that the "Server is not responding", try to use the next port, for example 1.2.3.4:1338.
Bonus 2: restore an existing game world
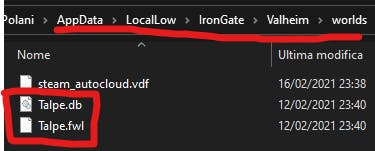
If you already have a game server and you're migrating to this one or you just want to use your local world, only two files are required to achieve this: .dband .fwl. For example, on your computer you can find them in %AppData%/LocalRow/IronGate/Valheim/worlds/:
Now put them inside the ~/.config/unity3d/IronGate/Valheim/worlds/ folder of your account, be sure the permissions are right running chmod 664 ~/.config/unity3d/IronGate/Valheim/worlds/ and restart the game server with ./vhserver restart .
Enjoy your game!